|
|
VSAAB
-- The Vintage SAAB Information Source! VSAAB Articles How To Rebuild Your Sonett Brakes |
 |
|
|
VSAAB
-- The Vintage SAAB Information Source! VSAAB Articles How To Rebuild Your Sonett Brakes |
|
(please click on the diagrams for a closer look)
Please note: The following mechanical advice is offered to enhance the overall knowledge of the automobiles owner only. Any and all work described in the following article should be performed by a licensed mechanic only. The author shall be held harmless in the event of injury or accident by the automobiles owner and occupants, should the work be performed by an unlicensed mechanic.
See Bud Clarks brake system interchange data at the end of this article to determine if your car (Non- Sonett) uses the same parts as mentioned in this article.
After twenty plus years your Sonett is probably ready for a complete brake system rebuild. Some of the more common symptoms of a tired brake system include:
If you don�t want to chase these kinds of problems from one end of your car and back again, you should go with a complete system rebuild. A rebuild of the brake master cylinder is covered here. Use that article in conjunction with this one for a complete rebuild of the brake system.
|
Parts
List and Availability |
Other
Parts Sources |
|||||||||||||||||||||||||||||||||||||||
All of the above parts should be available directly from Saab |
|
Keep in mind
that the following instructions cover a complete brake system overhaul.
Many of the steps can be skipped entirely if only a partial job is being
performed. You will note that I have left out most reassembly
instructions from this article. Where no reassembly instructions are
given, simply reverse the disassembly instructions.
If replacing the rotors (brake disc), remove the axle split pin (cotter
pin) and castle nut before jacking up the car. Jack up the car, remove
the wheels. Flatten the ends of the long split pins that secure the
spring retaining clips and remove.
DISC BRAKE COMPONENTS FROM MODEL 1967
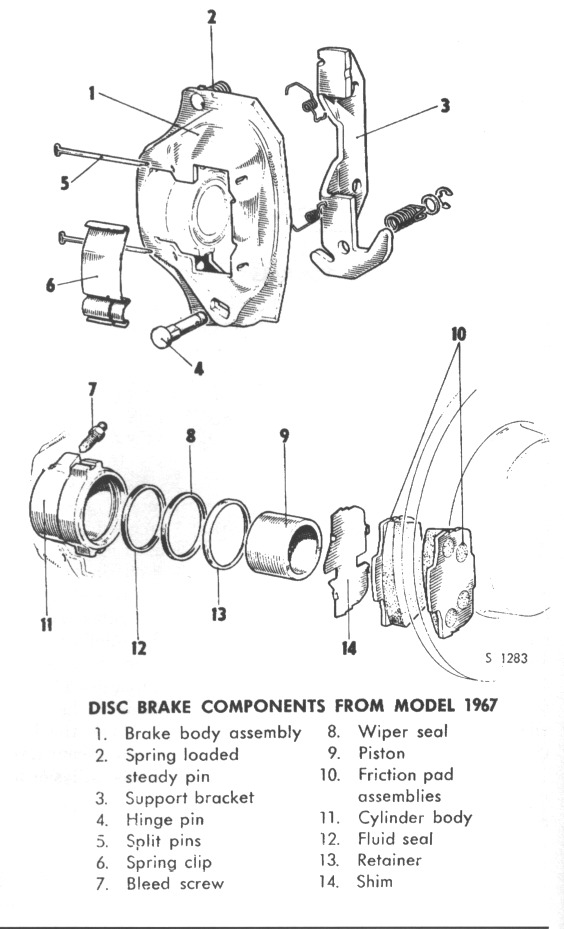 |
Front Brake Disassembly Pull out the retaining clips; if they are rusty they should be replaced. Pull out the brake pads; note that the friction material is beveled. The new pads must be installed with the bevels facing the same way. The inner pad may or may not have a metal shim clipped over it. Saab added the shims at some point to prevent squeaking. If you�re just replacing the pads, you must compress the caliper piston with a flat bar to make room for the new thicker pads. Be careful to keep the piston square in the bore during compression. Keep an eye on the brake fluid reservoir to make sure that it doesn�t overflow during compression. Helpful hint: If compressing the piston is a problem, open the bleeder to allow the fluid to escape during piston compression. |
Caliper Piston Removal
After removing the pads, pump the brake pedal to force the pistons out of the bore. Have a pan ready under the calipers to catch the brake fluid. If the pistons will not come out completely (they usually don�t), they can be twisted out by hand or blown out later with compressed air. Open the rear bleeders, pump the brake pedal until fluid stops running out. Unscrew the rubber brake hose from the back of the cylinder body just enough to loosen it (1/4 turn). Bend back the locking tab washers on the two bolts that secure the caliper assembly to the driveshaft carrier, remove the bolts. Spin the entire caliper assembly to remove it from the brake hose.
Brake Hose Removal
Working from inside the engine compartment, remove the nut that secures the steel brake line to the back of the brake hose. Now remove the nut and lock washer that holds the brake hose to the inner fender well. Warning-The area above the brake master cylinder is notorious for rust. This, combined with a very confined work area, almost always makes for a less than satisfying experience.
Steel Brake Line Replacement
If the
outside of the brake lines have deep pitting or scale, they should be
replaced. Even if the lines appear to be all right on the outside, they
are often lined with scale or sludge. No amount of bleeding will remove
this and it can cause leaking calipers and wheel cylinders over time. To
replace the steel brake lines you will need a flaring tool capable of
�double flares� and a tubing cutter. Bring your old lines to an auto
parts store and buy new tubing of the same diameter and longer in
length. Cut the tubes to the correct length after bending them to fit
the car. Be careful that the threaded connectors on the new lines have
the same thread as the old ones. If you can�t find the correct
threaded connectors (I never seem to), don�t worry, just remove the
old connectors and reuse them on the new tubing (condition permitting of
course). If you have never used a flaring tool before, be sure to have
someone with experience give you a few lessons before trying it
yourself. The tubing can be bent very easily to match the originals. To
prevent kinking the lines, bend them over a hard cylindrical object like
a coffee can. Always deburr the inside diameter of the lines after
cutting to prevent flow restrictions. Never bend the lines after they
are installed, as this will put permanent stress on the connectors.
Rotor Replacement
With the caliper assembly already removed, use a wheel puller to remove
the hub (with the rotor still attached) from the splined end of the
axle. The rotor can now be unbolted from the hub and replaced.
Caliper Rebuilding
Make a note
as to how the two springs that secure the cylinder body to the caliper
assembly are fastened before removal. With the springs removed, the
cylinder body can be slid out of the caliper assembly. Sometimes a good
smack with a rubber hammer is needed. The caliper assembly pivots on a
hinge pin, the assembly can be opened up, pivoting on the pin to gain
better access to the cylinder body. Clean and lightly oil the area
around the pin before reassembly. If the piston is still stuck in the
cylinder body, compressed air can now be used to blow it out. Be
careful, the piston will shoot out like a champagne cork! If the caliper
piston�s chrome plating is pitted or cracked, it should be replaced.
Pry out the wiper seal along with its metal retainer. Remove the piston
seal noting its beveled edge. Clean out the cylinder body with brake
fluid paying special attention to the wiper seal-retaining groove.
Install the new piston seal. With the groove facing inward, press the
wiper seal inside the retainer. Tap the retainer inside the cylinder
body being extra careful not to bend it. Do not hit the retainer
directly with a hammer. Place a wood block on top of the retainer to
prevent it from being damaged. Saab made a special installation tool for
the retainer and you will probably wish you had one. Lubricate the seals
with special brake lube or brake fluid. Press in the piston leaving
about 1/4� sticking out.
Rear Brake Drum Removal
Tap off the
axle end cover using a screwdriver and hammer. Remove the cotter pin,
castle nut and washer. Make sure the emergency brake is released, and
then back off on the brake adjuster located on the rear of the drum.
Using a drum puller, remove the drum.
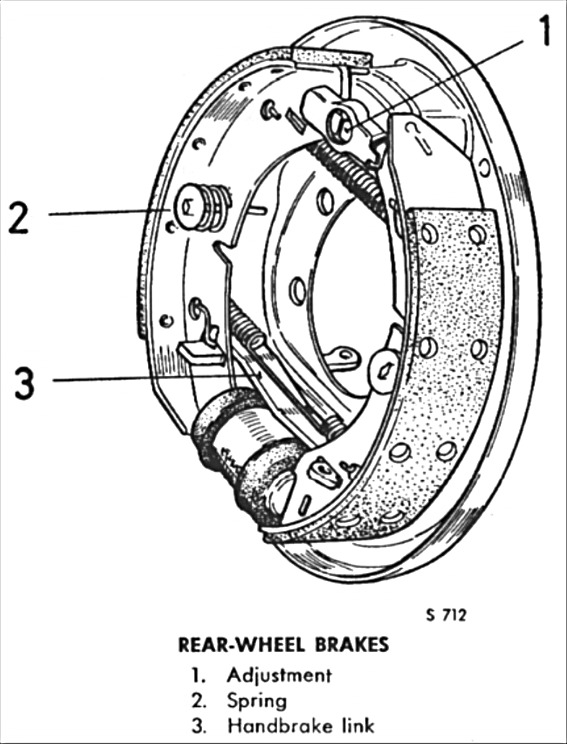
| Brake Shoe Removal Remove the two spring retainers by grasping them with a pair of pliers, pushing in, and turning 90� to release. Before removing the shoes, note the attachment of the return springs and the position of the friction material on the shoes. You will notice that the friction material is offset to one end of the shoe. The new shoes must be installed the same way. Remove the shoes by forcing the top of them apart, against the pressure of the return springs. This will allow the shoes to be removed from the adjuster mechanism. Pry the bottom of the shoes out of the wheel cylinder while simultaneously removing them from the hand brake link. With the shoes removed, the adjuster should be completely unscrewed, taken apart, cleaned and oiled. |
 |
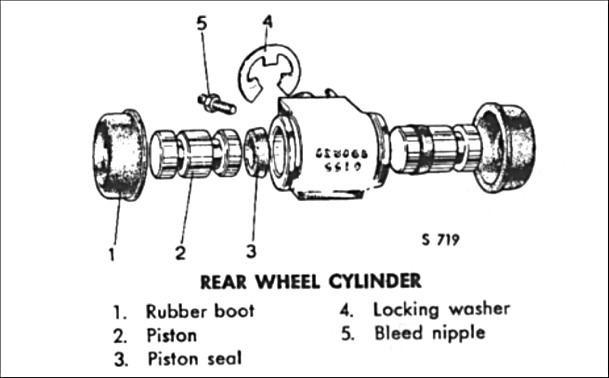 |
Wheel Cylinder Removal and Rebuilding Remove the nut that attaches the steel brake line to the rear the cylinder. Press off the locking clip that holds the cylinder to the backing plate. Tap out the cylinder. Remove the dust covers and pull out the pistons. Using a small two stone hone with plenty of brake fluid as a lubricant, hone the bore just enough to smooth it out. If the bore is pitted, the cylinder must be replaced. Clean all parts with brake fluid. Install new piston seals with the bevel facing correctly. Lubricate seals with special brake lube or brake fluid. Press in pistons and install new dust covers. |
Brake Fluid
I really
don�t want to start a debate on the use of silicone (dot 5) brake
fluid, but I�ll put in my two cents worth anyway. Here are a few facts
that you should know about Silicone brake fluid. Silicone does not
absorb water like dot 3 or 4. This can help prevent leaky brake
cylinders in cars that are stored for the winter. Silicone fluid can
make your brake pedal feel squishy. Silicone fluid will leak past worn
rubber seals more readily than dot 3 or 4. I would not recommend using
dot 5 unless all rubber seals have been replaced (including the ones in
the brake master cylinder). All of the old fluid must be bled out before
using Dot 5, never mix fluid types.
Brake Bleeding
|
The One-Person Method |
The Two-Person Method |
| Buy a six foot long piece of clear fish tank tubing. Make sure the tube fits over the bleeder nipples tightly. Tape one end of the tube to the top of a broom handle or shovel. Lean the shovel/broom up against the car near a wheel. Slip the other end of the tube over a bleeder nipple and open it up a turn. The idea is simple. While sitting in your car you can slowly pump the pedal while watching the brake fluid rise inside the clear tube. The air bubbles simply escape out of the top of the tube. When you stop seeing bubbles, close the bleeder and move on to the next one. Use the same bleeding sequence as mentioned in the �two person method�. | Close all of the bleeders accept the passenger side (right) rear. Place a clear plastic tube over the bleeder, put the other end in a clear bottle or glass. Fill the brake fluid reservoir. Two people are required, one to slowly pump the pedal and the other to open and close the bleeder with each pump of the pedal. The tube must be kept in the bottom of the glass, immersed in fluid. When the pedal is depressed the bleeder is open, when the pedal is raised, the bleeder is closed, the �pedal person� must call out �up� or �down� so that the other person knows when to open and close the bleeder. The idea is to get all of the air out of the system. When you stop getting air bubbles move to the left front, followed by the left rear and right front. Don�t forget to refill the reservoir as needed. You probably will have to make the rounds two or more times before all of the air is removed. Remember, patience is a virtue! |
Brake Adjustment
The front brakes are self-adjusting, as the pads wear down the caliper piston moves out, maintaining correct pad pressure. To adjust the rear brakes, jack the wheel up off the ground. Spin the wheel while tightening the adjuster until the wheel stops spinning. Back off the adjuster just enough to allow the wheel to spin. Pump the brake pedal a few times and readjust. New rear shoes will �bed in� quickly, throwing the brakes out of adjustment. Check them again after a thousand miles or so.
When the V4 cars came out, a new single piston pivoting caliper was introduced---I think it was a cost issue. This is the same exact system used on the all Sonetts, starting with VIN 000029---the first 1967 car. The Sonett is also the only stroker car to come from the factory with this particular system. All of the cars mentioned above use basically the same shoes and linings in the rear. The cars up through 1966 had 3/4" diameter rear wheel cylinders, and a little pressure regulator for each circuit under the rear seat. They are located under the gas tank in the first 28 Sonetts. After that, the rear cylinders are 5/8" in diameter. Even though the 95s had the same brakes as the 96s, they used the larger rear cylinder without the pressure regulator through 1969----in 1970, they got the 5/8" diameter cylinders like in the 96s and Sonetts.
Even
though the standard cars had drums on the front, the rear brakes were
the same on all models at the time of manufacture---and the cars
produced from VIN 135,000-96, and VIN 3131-95 have the same rear
brakes----this was sometime in late 1961, according to the parts
manual. The 1964 95s and 96s used the same master cylinder the
Sonett used. 1965-1968 master cylinder are the same
mechanically, but the brake lines connect to the opposite side.
In 1969, the 95s and 96s got power brakes, and a re-designed master
cylinder. The rear drums on the 96s are the same as Sonetts-----because
the 95s use larger bearings in the rear, I'm not too sure if the drums
will fit a Sonett.
Take care, Bud.
So, what do you think of this? Send us your thoughts and comments by clicking HERE!
|
Help keep VSAAB alive and well! Click the icon to use PayPal for your donation, and THANK YOU! |
All product and trade names
mentioned on this site are the trademarks of their respective companies.
�VSAAB, 1998-2001 All rights
reserved. VSAAB is not affiliated with SAAB Cars USA or SAAB Automobile.
"VSAAB" is a trademark of the San Diego SAAB Owner's Group, San
Diego, California USA.
All information here is presented as personal opinion. Ask, think, do.
Last modified: January 10, 2023