|
|
VSAAB
-- The Vintage SAAB Information Source! VSAAB Articles How To Remove The Body From Your Sonett |
 |
|
|
VSAAB
-- The Vintage SAAB Information Source! VSAAB Articles How To Remove The Body From Your Sonett |
|
Please note: The following mechanical advice is offered to enhance the overall knowledge of the automobiles owner only. Any and all work described in the following article should be performed by a licensed mechanic only. The author shall be held harmless in the event of injury or accident by the automobiles owner and occupants, should the work be performed by an unlicensed mechanic.
 SAAB
Sonetts are now considered historical vehicles and
are, to put it bluntly, very tired old cars if they haven't
already been restored. Many of these lovely, Swedish
beauties have been poorly patched back together in
an effort to keep them on the road and are far from original.
Thousands have already found their way to the wrecking
yards due to accidents, abuse and most of all, RUST. Despite
their fiberglass bodies, rust is a major problem. The
steel floor pan is especially rust prone in the rocker
panels, trunk floor, rear axle tunnel, rear door jams and passenger
compartment floor near the front
wheel wells. Some areas prone to rust are only
accessible after complete body removal.
SAAB
Sonetts are now considered historical vehicles and
are, to put it bluntly, very tired old cars if they haven't
already been restored. Many of these lovely, Swedish
beauties have been poorly patched back together in
an effort to keep them on the road and are far from original.
Thousands have already found their way to the wrecking
yards due to accidents, abuse and most of all, RUST. Despite
their fiberglass bodies, rust is a major problem. The
steel floor pan is especially rust prone in the rocker
panels, trunk floor, rear axle tunnel, rear door jams and passenger
compartment floor near the front
wheel wells. Some areas prone to rust are only
accessible after complete body removal.
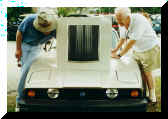
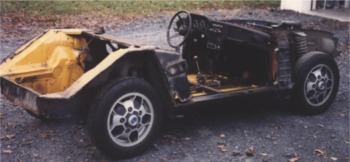
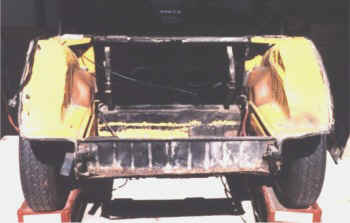
Prior to removing the body pieces, remove the battery, seats and carpeting. Prepare an area large enough to safely store the hood and rear section. Have plenty of blankets available to cushion the fragile body and window glass pieces during storage. How long will it take? Two people can remove the entire body in one very long, frustrating day. Have fun...
Sonett II /V4 (1966-1969)
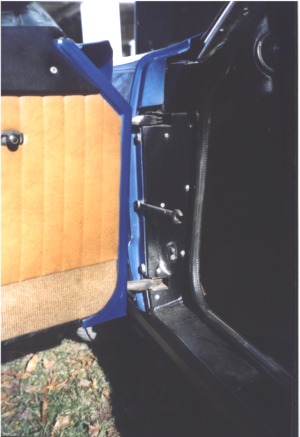
Doors:
1. Open the door
and remove the small pin from the doorstop.
2. While supporting the bottom of the door, remove the door
hinge retaining nuts.
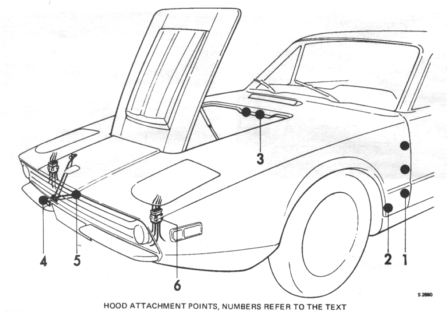
Hood:
1. Tilt the hood
open.
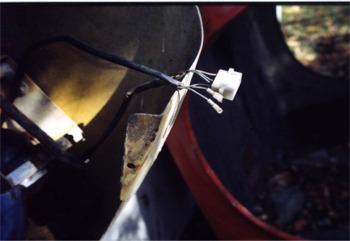
2. Unplug the headlight wiring harness located on either side of
the top radiator brace.
NOTE:
look for wires bypassing the
original harness plugs.
3. Unbolt the hood stop strap on the driver's side wheel well.
4. Lower the hood.
5. Remove the two hood hinge bolts.
6. Lift the hood forward and then off.
Rear Body:
1.
Remove the wooden trunk floor, spare tire and all other
trunk articles.
2. Remove the right and left trunk side upholstery and underlying
insulation. No
insulation? Install some later to reduce road noise.
3. Unplug the taillight harness on top of driver's side wheel
well.
4. Unscrew the tail light ground wires from the floor pan.
5. Disconnect the radio ground and antenna wire if so equipped.
6. Remove the gas cap.
7. Remove the rubber gas cap collar.
8. Pull the door seals down from the door openings.
I suggest removing the chrome
trim from the bottom of
the door opening to allow complete removal of the seals.
9. Lift up the gas tank bulkhead upholstery to gain access to the inner
door latch
striker plates.
10. Spray the inner striker plates with WD-40, then remove the four
striker plate screws.
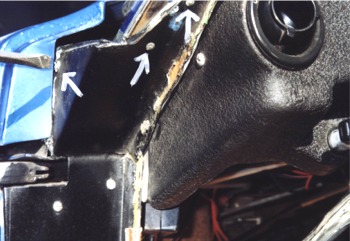 11. Drill out the door jam pop rivets.
12. Drill out the three uppermost pop rivets from the cover
plates in the front door jams (on
the lower windshield
pillars). If the cover plates are rusty and need to be repainted,
now is a good time to remove them
completely.
13.
Knock all the pop rivet shanks inside the body with a punch.
14. Unscrew the heater core cover. Remove the inner core
cover.
 15. Remove the 12 machine screws and lock nuts that go through
the firewall and into the
15. Remove the 12 machine screws and lock nuts that go through
the firewall and into the
fiberglass body. Remove
the two screws from either side of the windshield wiper spindles.
16. Windshield removal is a good idea to prevent breakage while lifting
off the body.
17. Remove the two small bolts from the bottom of each window pillar.
The bolts
are accessible in the very
narrow gap between the side of the dashboard and the
window pillar. NOTE:
The Saab Sonett service manual describes removing different
bolts at the bottom of the window pillars (one big one on each
side). These bolts are only
accessible after pulling out the dashboard. I prefer
removing the four small bolts (two on each side) and leaving the
dashboard alone.
18. Under the dashboard, turn the rear dashboard support clips
to either side.
19. Remove the leather
stop strap from the trunk door, swing the door all the
way down.
20. Back off the hinge screws and slide the pins toward the center of
the car
(good luck!). Soaking
the sliding pins with oil for a week
before attempting removal is a very good idea.
21. Remove the trunk door.
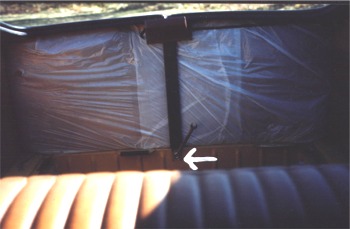
22. Remove the rear glass (highly recommended). Be very careful,
the rear glass is no longer available.
23. Remove the body retaining screws over the roll bar and in front of
the rear wheel
wells.
24. Remove the two body bolts from inside each rear wheel well. They are
very close to the rear of the
body and usually hidden under lots of undercoat.
25. Remove the round
water drain tubes near the bottom of the windshield pillars
(if so equipped).
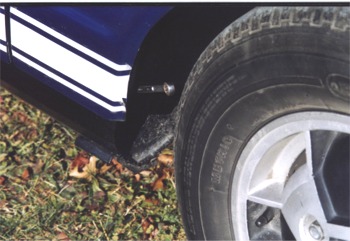 26.
Using a sharp one-inch putty knife, separate the rear body seals from
the fiberglass body.
26.
Using a sharp one-inch putty knife, separate the rear body seals from
the fiberglass body.
27. If your muffler exits through the rear body opening, remove the
muffler.
28. Remove all sealants that hold the body to the pan.
29. Gently break the body completely free from the pan.
30. Using three people, one on either side and one at the rear,
lift off the body. It will be necessary to pull the rear fenders
outward in order to clear the
rear door jams. Don't worry, the paint and body
will not crack.
31. Store the body out of the work area.
Sonett III (1970-1974)
 Doors:
1. Remove the
upper door panel trim.
2. Remove the door release lever handle (early Sonetts).
3. Remove the door release handle insert trim (late Sonetts)
4. Remove the window crank handle.
5. Remove the door pull handle.
6. Unscrew the door lock knob.
7. Gently pry off the door panel with a screwdriver.
8. Remove the plastic vapor barrier. No barrier? Install one later.
9. While supporting the bottom of the
door, remove the two
large nuts from the door hinges.
 Hood:
Hood:
1. Remove the
engine cover hatch.
2. Remove the three bolts from each
side of the front door jam.
(1)
3. Remove the two
bolts from either side of the engine cover latch. (3)
4. Remove the body fastener
from each side of the rear section of the front wheel
wells. (2)
5. Remove the right
and left splashguards from the wheel
wells.
6. Unplug the wires from the horns in the left front wheel well.
7. Remove the body bolts located below
the bottom corners
of the radiator. (5)
8.
Late crash bumpers only - remove the two bolts that go through the
nose just below the grill and into the bumper support braces. In
the engine
compartment, remove the two bolts on each side
that hold the bumper support braces inside the body channels.
While sitting in front of the car, push the bumper
up and down while pulling out. The idea is to remove the bumper
with the support braces still
attached. 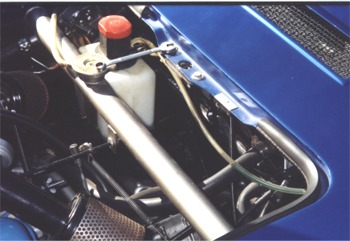 NOTE: This cannot be done if the tabs
welded to the support braces are located behind the body. If yours
are behind the
body, you must remove the nose with the support brackets still in
place. The tabs welded
to the bumper braces always seem to be in the way when
removing or installing the nose. I ground the tabs off my Sonett
III's bumper
braces and have never regretted doing so.
NOTE: This cannot be done if the tabs
welded to the support braces are located behind the body. If yours
are behind the
body, you must remove the nose with the support brackets still in
place. The tabs welded
to the bumper braces always seem to be in the way when
removing or installing the nose. I ground the tabs off my Sonett
III's bumper
braces and have never regretted doing so.
9. Early foam bumpers only - Remove the bolts that go through the nose,
below the grill,
and into the support brace behind the fiberglass. (4)
10. Unplug the headlight wiring harnesses, located on either side of the
radiator. (6) NOTE: Look for
any wires bypassing the original harness plugs.
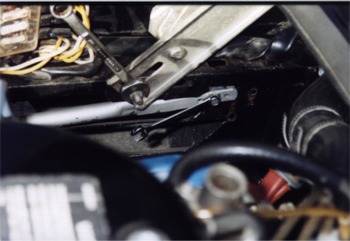
1l. Remove the small bolt at the end of the headlight lifting
control arm.
12. Remove the bolt in the headlight lifting mechanism,
just above the headlight lifting control arm (the bolt is located
in a slot).
 13.
Remove the windshield washer tubes where they enter the windshield
washer pump.
13.
Remove the windshield washer tubes where they enter the windshield
washer pump.
14. If your doors are still on the car, protect the leading edge of the
doors from chips with a couple
of layers of electrical tape. Prop the doors open
a few inches to allow additional clearance. Lift off the nose with
one person on
each side of the car. Place one
hand on the lip above the directional lens and the other in
the top of the wheel
well. Lift the rear of the nose first,
then the forward portion. Dip down the passenger side front corner of
the nose a little. This
will allow the person on the driver's side to raise the
nose up enough for the headlight raising mechanism to clear the brace
that goes over the top of
the radiator.
 15.
After removal, use duct tape to secure the spring-loaded headlight
raising mechanism in the
"closed" position. This will make installation easier.
15.
After removal, use duct tape to secure the spring-loaded headlight
raising mechanism in the
"closed" position. This will make installation easier.
16. Nose storage - stand the nose up
with the painted side facing a wall. Place
some pillows under it and cover with a blanket. Now is a great time to
rewire the lights.
Rear Body
 1.
Remove the wooden trunk floor, spare tire and all other trunk articles.
1.
Remove the wooden trunk floor, spare tire and all other trunk articles.
2. Remove the air dampers from the
hatch glass if so
 26.
Spray the inner striker plates with WD-40, then remove the four
striker plate screws.
26.
Spray the inner striker plates with WD-40, then remove the four
striker plate screws.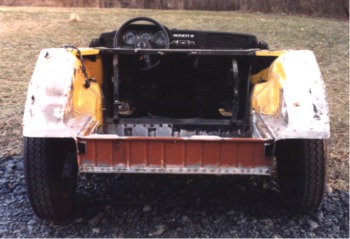 36.
Windshield removal is a good idea to prevent breakage while lifting off
the body.
36.
Windshield removal is a good idea to prevent breakage while lifting off
the body.Bruce
Turk
November 2001
So, what do you think of this? Send us your thoughts and comments by clicking HERE!
|
Help keep VSAAB alive and well! Click the icon to use PayPal for your donation, and THANK YOU! |
All product and trade names
mentioned on this site are the trademarks of their respective companies.
�VSAAB,
1998-2002 All rights
reserved. VSAAB is not affiliated with SAAB Cars USA or SAAB Automobile.
"VSAAB" is a trademark of the San Diego SAAB Owner's Group, San
Diego, California USA.
All information here is presented as personal opinion. Ask, think, do.
Last modified: January 10, 2023