|
|
VSAAB
-- The Vintage SAAB Information Source! VSAAB Articles How To Rebuild Your Front End |
 |
|
|
VSAAB
-- The Vintage SAAB Information Source! VSAAB Articles How To Rebuild Your Front End |
|
This article originally appeared in "NINES". The information contained in this article is meant as a guide for owners who are mechanically adept and have some experience. Parts availability may have changed since this article was written.
 If
your driving or restoring a vintage Saab that has all of its
original front end components, you should consider a complete
front end rebuild. Time takes
its toll on ball joints, tie rod ends and control arm
bushings. By replacing these parts you can restore the
cars handling to the way it was when
it left the factory. Another
good reason to do the job is because all the parts are still
available from Saab,
amazing. If
your driving or restoring a vintage Saab that has all of its
original front end components, you should consider a complete
front end rebuild. Time takes
its toll on ball joints, tie rod ends and control arm
bushings. By replacing these parts you can restore the
cars handling to the way it was when
it left the factory. Another
good reason to do the job is because all the parts are still
available from Saab,
amazing.
Please note that all 1955 through 1980 93's, 95's, 96's and Sonetts share the same front end components. If you own any of these cars you can order the same parts and follow the instructions in this article. Front end rebuilding is not for the first time mechanic. The job requires a complete set of tools and a fair share of mechanical ability. Don't be surprised if the job takes more than one day since parts seized by rust seem to be the norm.With one exception, the special tools described in Saab service manuals are not needed to rebuild the occasional front end. The one tool that is needed is a coil spring compressor. The spring compressor is used to take the pressure off the front end components to facilitate removal. Attempting to remove the ball joints, for instance, without the use of a spring compressor, can result in serious injury. Under no circumstances should any of the following procedures be attempted without the use of a high quality spring compressor. Most coil spring compressors require more room to operate than is available under a Sonett's bonnet, making bonnet removal necessary. Likewise, the fenders on 93's, 95's, and 96's might have to be removed.The following parts can be ordered directly from Saab: 4 pcs. rubber bumper #7071145 Tie rod ends are also available
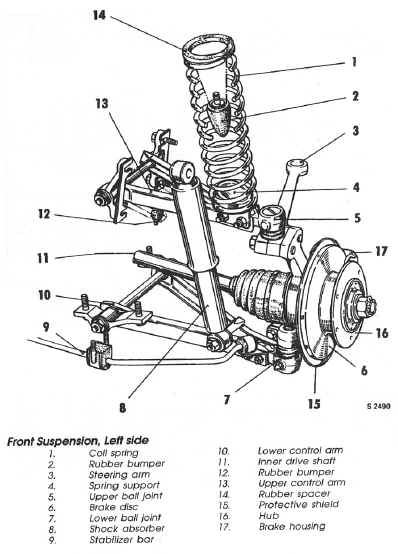
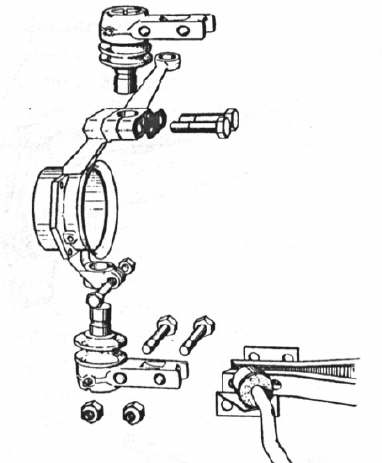
at Auto Zone, part # 011940 ES2164 Part Notes: The new replacement control arm bushings are of the one-piece variety. They are the correct replacement for the earlier two-piece type. The new replacement ball joints do not have grease fittings as found on early cars. All four are interchangeable and can be used as uppers, lowers, rights or lefts. The new tie rod ends no longer come with grease fittings and are also interchangeable, they can be used on the right or left side. They also come with nylon insert lock nuts, replacing the old style castle nut and cotter pin.To begin, remove the bonnet or fenders and safely block up the front end. Remove the wheels and shock absorbers.Tie Rod End Removal Back off the nut that locks the tie rod end to the rack and pinion. Remove the cotter pin and castle nut. If you have a ball joint breaker tool, insert it between the ball joint and steering arm, hit with a hammer to release. If a ball joint breaker is not available, two large slotted screwdrivers can be used. Wedge the screw drivers on either side of the ball joint, under the steering arm. Hit the handles with a hammer. A few good smacks on the steering arm while the tie rod end is under pressure will often break it free. Spin the tie rod end off the rack and pinion; record the number of revolutions it takes to remove.Upper and Lower Control Arms Inside the engine compartment, loosen the clamp that secures the big end of the inner drive shaft rubber boot. Unbolt the disk brake housing and tie off out of the way. Do not allow the brake housing to hang from the brake hose. For cars equipped with drum brakes, pull the brake drum, remove the four bolts that hold the back plate to the steering knuckle. Pull off back plate and tie off out of the way.Install the coil spring compressor and fully compress the spring. Remove one bolt that secures the spring support to the upper control arm. Insert a drift pin where the bolt was removed. The pin will prevent the spring support from binding on the remaining bolt during removal. After the second bolt is removed pull out the pin. Tap the spring support with a hammer, sliding it along with the coil spring to the end of the upper control arm. Remove the spring support and coil spring. Support the bottom of the hub assembly with a block or jack. This will prevent the assembly from dropping on your toes during the next step.Remove the two bolts that fasten the lower ball joint to the lower control arm. The ball joint is now free to slide out of the control arm along with the hub assembly and inner drive shaft. Note: the later style (non-rubber donut) inner drive shafts contain two roller bearings. The bearings are located inside the inner axle rubber boots. Great care must be taken to secure these bearings before attempting to pull the axles through the inner fenders. A plastic bag pulled tight around the axle with a rubber band will do the trick. Early cars equipped with "rubber donut" inner drivers are much easier to remove. When pulled, the splined end of the axle will simply drop out of the donut assembly. With the hub/drive shaft assembly laying on the floor, remove the two bolts that secure the upper ball joint to the steering arm. Remove the old ball joint and steering arm. Remove the bolt that secures the lower ball joint to the hub assembly; remove the old ball joint.
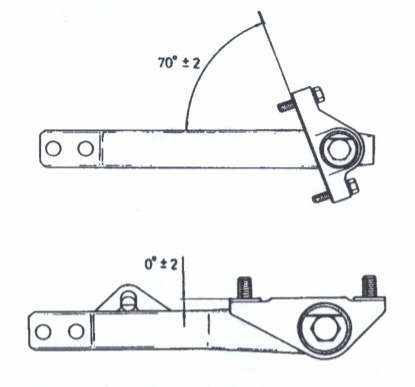
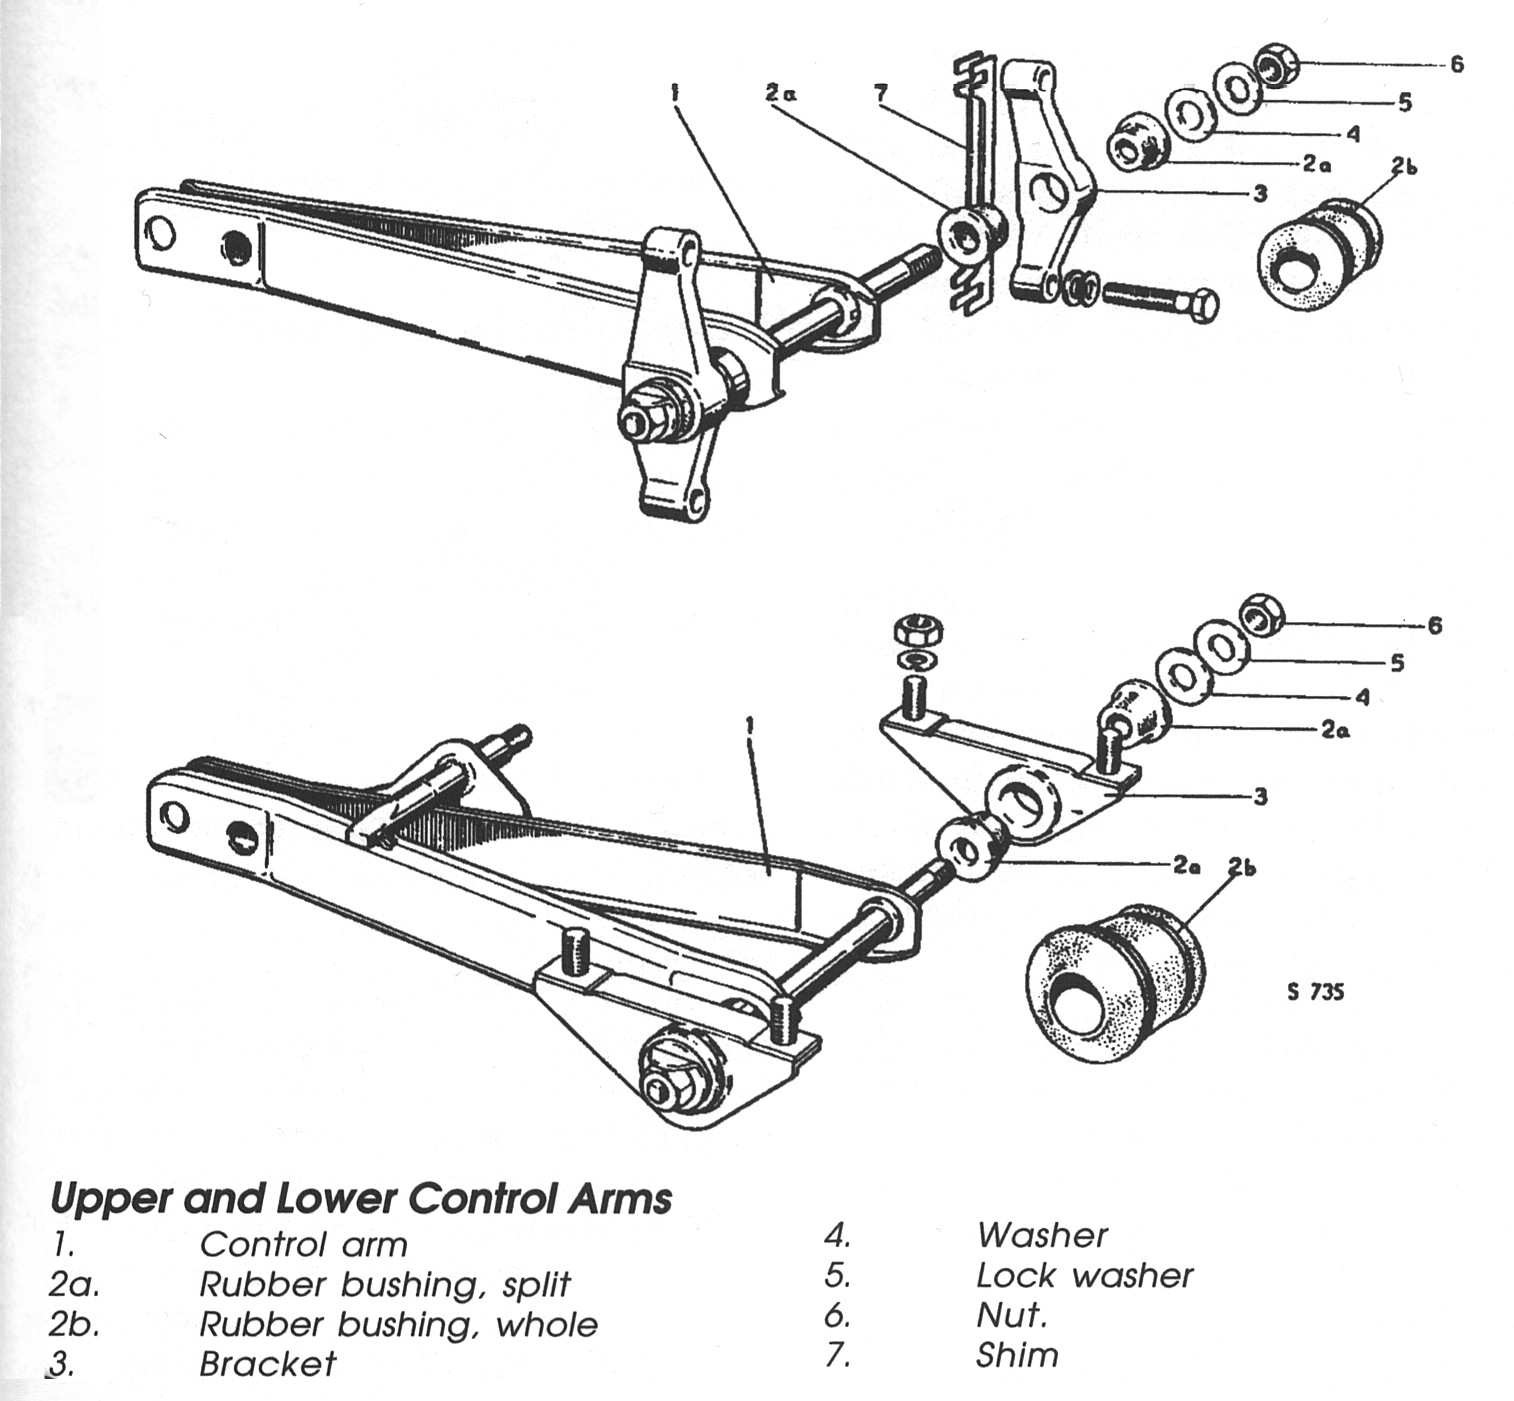
Remove the four bolts that attach the upper control arm to the inner fender. Pull the control arm out through the inner fender while carefully gathering the shims that lay underneath. Tape the shims together and label them so they can be reinstalled in the same place. Lower Control Arm Removal Remove the four nuts that secure the lower control arm to the floor pan. They are located inside the engine compartment. Pull the control arm down from the pan and slide it off the stabilizer bar if so equipped. Rubber bumper replacement Cut out the old bumpers with a razor knife. Spray the new bumpers with a mixture of soap and water. Pull the bottom of the bumper with a pair of pliers while simultaneously hitting the top with a hammer. The bumpers will pop into place. Bushing Replacement Lock a control arm in a vise, bend over the tabs on the lock washers and remove the nuts. Remove the brackets by twisting while pulling. If the brackets are stuck (did I say if ?) slice off the end of the bushing with a razor knife. This will allow the bracket to slide off over the bushing. Slide the old bushing off the control arm shaft. Note: the bushing's metal inner sleeve often becomes stuck to the control arm shaft. If this happens (did I say if again?) slice the rubber bushing lengthwise with a razor knife and peel off the rubber. Using great care not to damage the control arm shaft, cut off the bushing's inner sleeve with a metal chisel. After removal, file down any burrs on the shaft. The new bushings must now be pressed into the control arm brackets. Use soapy water as a lubricant because oil or grease will adversely affect the rubber over time. If you have the special Saab bushing installation tools you're lucky. For those of you who do not, read on. Select a socket that has an inside diameter slightly larger than the outside diameter of the bushing. Place the open end of the socket up against one side of the bracket and the bushing on the other side. Hold this "press assembly" together and lock in a vise. The idea is to slowly close the vise, forcing the bushing through the bracket until it mushrooms out inside the socket. By the time you press in the eighth bushing you will be an expert at this. Reassembly Smear a little "Never Seize" or grease on the control arm shafts before sliding on the brackets. This will prevent the new bushings from rusting to the shafts. Replace the washers, lock washers, and nuts. Note the correct angle between the control arms and brackets before tightening the nuts (see drawing). Slide the lower control arm over the stabilizer bar (if equipped) and secure to the floor pan with four lock washers and nuts. Pass the upper control arm through the inner fender, replace shims and secure with four lock washers and bolts. Tap a new ball joint inside the upper control arm. Slide the spring support over the upper control arm while swinging the compressed spring into place. Note: The coil spring has a top and bottom; the end that is ground flat is the top and the open coil end is the bottom. Align the holes in the spring support with the holes in the ball joint using a drift pin. Make sure the bottom end of the coil spring seats in the notch on the spring support. Secure the spring support with two bolts. Tap in and secure the lower ball joint inside the lower control arm using two bolts. Pick up the hub/drive shaft assembly and pass the axle through the inner fender and into the inner universal joint. Place the hub assembly over the top of the lower ball joint, replace the bolt. Slide the steering arm over the upper ball joint. Using a drift pin, align the hub assembly with the steering arm and bolt in place. Don't forget the locking shim that goes under the bolt heads. If aligning the holes is a problem, place a jack under the end of the lower control arm to take some weight off the hub assembly. This will allow you to reposition the hub assembly more easily. Remove the spring compressor. Spin the new tie rod ends onto the rack and pinion the correct number of revolutions (remember you counted?). Secure the tie rod end to the steering arm with a lock nut. Tighten the rack and pinion nut to the tie rod end. Reattach the disc brake housing to the hub assembly. On cars equipped with drum brakes, reattach the back plate and brake drum. Secure the clamps on the inner axle boots. Install shock absorbers, wheels, bonnet or fenders. Have the front end aligned as soon as possible to prevent uneven tire wear and poor handling. Don't be surprised if your steering wheel is not straight, this should correct itself after front end alignment. Although there are several ways
to rebuild a front end, I believe you will find my way safer
and easier than most. Have fun. |
|
Bruce
Turk, 5/01
|
So, what do you think of this? Send us your thoughts and comments by clicking HERE!
All product and trade names
mentioned on this site are the trademarks of their respective companies.
�VSAAB, 1998-2005 All rights
reserved. VSAAB is not affiliated with SAAB Cars USA or SAAB Automobile.
"VSAAB" is a trademark of the San Diego SAAB Owner's Group, San
Diego, California USA.
All information here is presented as personal opinion. Ask, think, do.
Last modified:
January 10, 2023

 Upper Control Arm Removal