|
|
VSAAB
-- The Vintage SAAB Information Source! VSAAB Articles How To Rebuild the Mighty Three |
 |
|
|
VSAAB
-- The Vintage SAAB Information Source! VSAAB Articles How To Rebuild the Mighty Three |
|
This article originally appeared in the "NEWS," the official newsletter of the New England Sonett Club and later appeared in "NINES". The information contained in this article is meant as a guide for owners who are mechanically adept and have some experience.
| Rebuilding
one of Saab's three cylinder, two stroke motors is much easier
than a lot of people would lead you to believe. After
all, the motor really does only have seven moving parts. They
are: the three pistons, three connecting rods and the crank.
Back in the good old days you would pop out the motor, hone
the cylinders, replace the pistons and crank and be back on
the road the same day! The good news is that the actual
rebuilding is as easy as it ever was, the bad news is that you
can no longer walk into your local Saab dealership and walk
out with a new crank and over sized pistons. The best that you
can do today is diagnose the problem, purchase the parts that
you need from one of the very few two stroke specialists still
in existence, and make your repairs.
The purpose of this
article is to save you a bunch of money by doing all the
"grunt" work yourself. Forget about doing a partial
rebuild. Replacing a piston here or there with a
"good" used one is a recipe for disaster. Your
rebuild is going to cost $1,000 to $1,500 if you do the
assembly work yourself. This is a $1,000 savings over having
someone else do everything for you. |
|||||||||||||
| Motor
Disassembly: Separate the motor from the transmission,
remove the pressure plate, clutch disc and fly wheel. Remove
the distributor from the block by removing the clamp screw .
Remove the nut (28) from the front pulley. Using a puller,
remove the entire pulley/vibration damper assembly. Remove
lock ring (19) and gather up any shims that might be
underneath. Shims were sometimes installed at the factory to
take up crank end play. Pry out the front cover (16) and clean
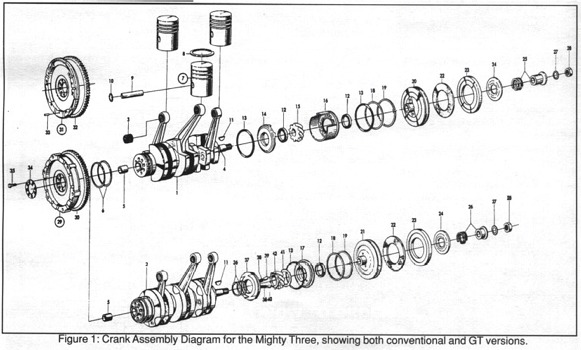
out the old grease. GT motors have a few parts on the
end of the crank that differ from standard motors
(Figure 1), just keep track of the order that they are removed
and reassembly will be very straight-forward.
Unbolt and remove the
cylinder head. Do not use a screwdriver to pry the head
off as this can damage the head gasket surface. Remove
the bolts that secure the motor mounts and lower water inlet
to the block. Remove the bolts that hold the crank case
to the block. Don't forget the two bolts that were
hidden behind the flywheel and the ones that face downward at
the rear of the engine. Using a rubber mallet, knock the crank
case off the bottom of the block. |
|||||||||||||
|
|
|||||||||||||
|
|
|||||||||||||
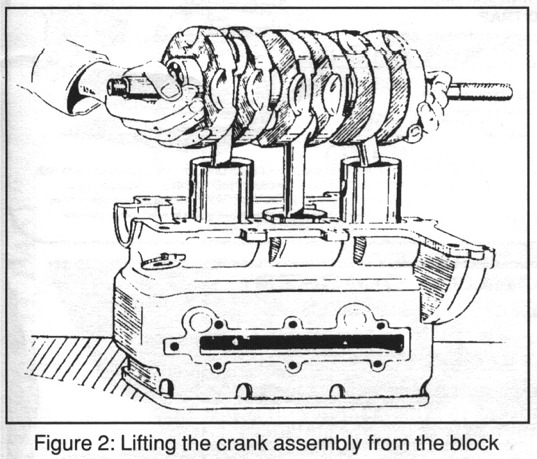
| Now for the fun part. Flip the motor upside down and stick a suitable arbor inside the hole at the back end of the crank. The arbor acts as a handle to help lift out the crank/piston assembly (see Figure 2). With a helper steadying the block, pull up on the crank until the pistons pop out of the cylinder bores. Sometimes the piston rings get hung up just as they near the bottom of the bore. This is caused by a ridge that develops from normal wear of the cylinders. If the pistons are stuck, gently rock the crank until the pistons release. |
|
||||||||||||
Pack up the crank with the pistons still attached and send them out for crank rebuilding and piston replacement. I can go into detail on piston classification, piston needle bearing sizes, and determining piston type, confusing and boring everyone to death, but I won't. Your parts supplier will determine the correct piston size and type. They will also fit the pistons to the crank so you don't have to worry about fitting the correct piston needle bearings. If you really want all the confusing details on these subjects, consult with a copy of the Saab two stroke engine manual. For the purpose of discussion, lets say you're using J & B Imports for your motor work. Call Bud at (714) 282-7378 or e-mail to jandbimports@abac.com and tell him that you're sending over a crank/piston assembly. Ask him to rebuild the crank and replace the pistons with the next oversize (usually 1/2 to 1 millimeter over). Bud will probably ask if there are any deep scratches in the bores that might require an unusual amount of boring to smooth out. If Bud needs the diameter of the bores or old pistons, no problem; your local engine rebuilding machine shop can measure them for you. Once you receive the
rebuilt crank and new pistons, its time to take them, along
with the block, crank case and head, to your local machine
shop. Tell the machine shop to boil the block, crank case
and head, to remove all the old carbon deposits. Ask them to
skim the head to insure it's flat and smooth. If you have a
oil injected motor, have them check the oil passages to make
sure they are clear. |
|||||||||||||
| I have the
cylinders bored to .005 (five thousands) over the piston
diameter. The correct amount of clearance between the pistons
and cylinder walls are open to debate. Saab set them up at
.002 and we all know the result: LOTS of seized motors! The
consensus is to set them up from .004 to .007, your machine
shop can help you determine how much clearance is needed for
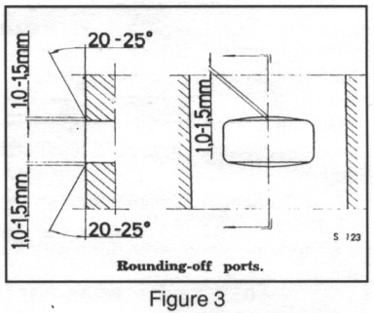
your type of driving. Make sure they match each piston to a specific bore (piston diameters can vary slightly). Ask them to round off the intake and exhaust ports so that the rings do not catch on them (see figure 3). If you're a little nervous about installing the crank/ piston assembly back in the block, ask the machine shop to do it for you. Total cost for boiling, head skimming, boring and port grinding should not exceed $300 (my guy charges $250). |
|
||||||||||||
|
To install the
assembly yourself, proceed as follows: Oil up the
crank, pistons and cylinder bores with plenty of two stroke
oil. Line up the piston ring gaps with the small ring stop
pins. Lower the center piston into the bore first, followed
by the pistons on either side. Make sure the crank's split
metal sealing rings (6) are turned so that the gaps do not
line up with the seam between the crank case and block.
The piston rings will
have to be compressed to allow them in the bores. Wrap some
electrical tape over the ends of two long, thin, slotted
screwdrivers. The tape will prevent scratching the rings.
Using both screwdrivers, compress the rings, one at a time,
while your helper lowers the crank into the block. I know
that turning a screwdriver loose on piston rings sounds a
little crazy, but it isn't. Remember, you're not
working on a sophisticated computer mainframe. You're
working on one of the "lowest tech," most
forgiving motors ever designed. If your cylinders
have never been bored, the factory installed taper at the
bottom of each cylinder might be sufficient to compress the
rings, making the use of screwdrivers unnecessary.
|
|||||||||||||
| Once
the crank is sitting happily in the block, rotate the rear
cover (14) so that the cut out corresponds with the hole for
the distributor. No sealing paste or "Form-A-Gasket"
should be used between the crank case and engine block. Just
clean the two surfaces and apply a thin layer of oil. Now you
can bolt up the crank case. See the list at the end of this
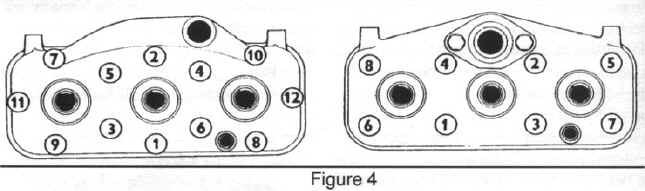
article for correct bolt torques. Install a new head
gasket with the broad side of the metal ring facing up.
Note: the head gasket must not be coated with any sealing
compound. Tighten the head bolts in a star pattern (see Figure
4). |
|||||||||||||
|
|
|||||||||||||
Fill the area around the
distributor gear with grease. Install the front cover
(16) with the arrow on the front of the cover pointing to
the T.D.C. timing mark on the block. Replace the shims, lock
ring, vibration damper and any other goodies that were
discovered during disassembly. Install the distributor,
flywheel and clutch assembly.
Break in
procedure: This is another topic open to debate.
Saab manuals list breaking in procedures that are as
different as night and day. One manual says not to
exceed 50 mph for the first 2,500 miles, while another one
says to accelerate from O to 50 mph as fast as you can, ten
times, and that no other breaking in is required! I prefer
to err on the safe side, so I use one quart of oil with six
gallons of gas and take it real easy for the first thousand
miles. A rebuilt motor will feel very tight for a long time.
My 93B's motor didn't feel completely broken in for the
first 3,500 miles. Now, after 5000 miles, it revs up in a
instant and takes forever to rev back down; just like a
happy stroker should! |
|||||||||||||
Bolt torques, all engines:
|
|||||||||||||
1955 through 1964 engines only:
|
|||||||||||||
Note: The head bolts should be re-torqued as soon as the engine has cooled after the first run. The second tightening at 600 to 1000 miles and the final tightening at 1500 to 2000 miles. All tightening should be done with the engine cold. |
|||||||||||||
1965 through 1968 engines only, head bolts (all):
All tightening should
be done with the engine cold. |
|
Note: Another source for
Two Stroke parts is Motorsport Sweden, check them out here.
Bruce
Turk, 3/01
|
So, what do you think of this? Send us your thoughts and comments by clicking HERE!
All product and trade names
mentioned on this site are the trademarks of their respective companies.
�VSAAB, 1998-2001 All rights
reserved. VSAAB is not affiliated with SAAB Cars USA or SAAB Automobile.
"VSAAB" is a trademark of the San Diego SAAB Owner's Group, San
Diego, California USA.
All information here is presented as personal opinion. Ask, think, do.
Last modified:
January 10, 2023